
Redo In Red & Chevron: DIY Upholstered Arm Chairs
Psssst… this post *might* contain affiliate links: see my disclosure here.
Our living room has this one area that’s been tough to figure out. I wanted a piece of furniture that wouldn’t take up too much space, but could provide seating. Something that could be flexible in case we wanted to open up the two rooms, but wouldn’t feel too haphazard. Craig to the rescue.
![]()
How to Reupholster Arm Chairs
These two chairs were listed for $75 each. Here’s what I liked: The shape. The details. The portability. The potential.
![]()
Shop my favorites!
![]()
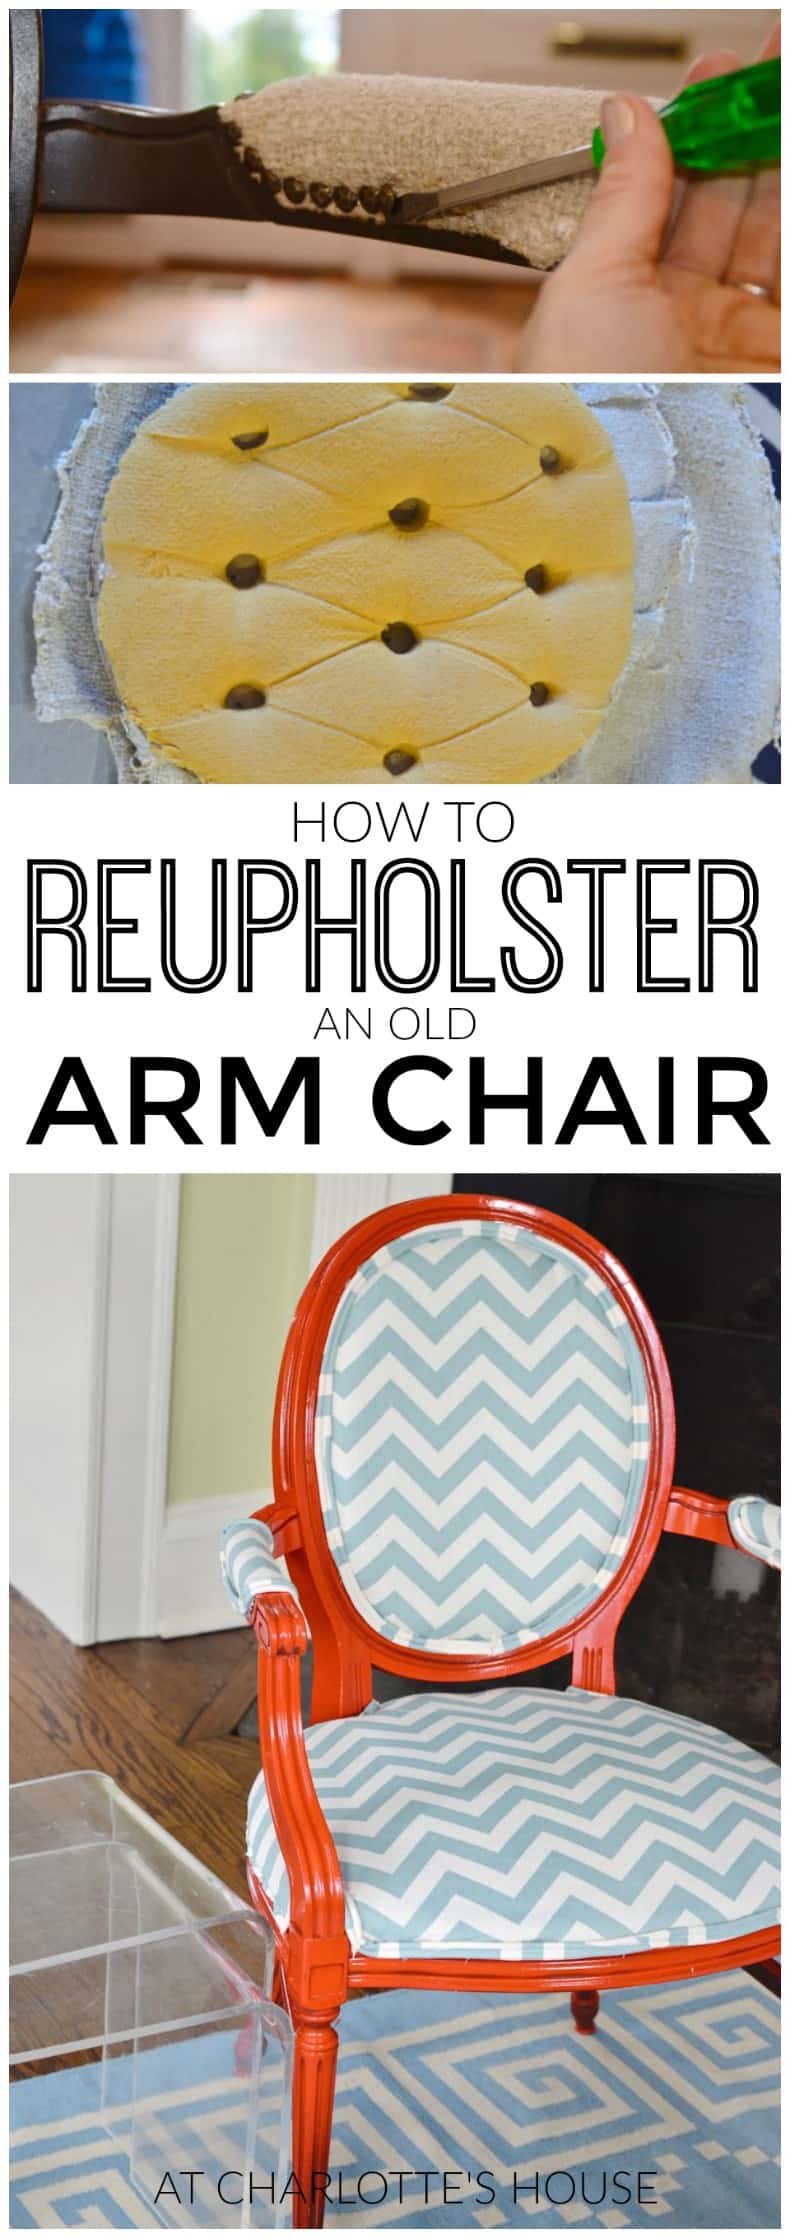
Here’s what I didn’t like… the price. I responded to the seller and asked if the price was negotiable. I ended up getting both chairs for $100. Not bad considering this same chair goes for $299 at World Market and $320 at Wisteria (both affiliate links). So onto the business of making gross into glam. With all of these projects, I come away with a list of lessons learned. These chairs are no exception. First lesson learned? There’s a special place in DIY hell for nailheads and staples. (Supply list at the end of the post.)
Step 1. Remove Nailheads, old Fabric and Staples
![]()
I wanted to reupholster. Another reason I like this style is that there’s not a ton of fabric which keeps the project cheaper. In order to get the fabric off, I had to use a flat head screw driver and some needle nose pliers to pull out Every. Single. Nail head. And staple. Chocolate helps.
![]()
Step 2. Save the Old Fabric To Use as a Template
Make certain to take lots of pictures before and save every piece of fabric you remove…. these will be your templates for the new fabric. Second lesson learned? Fabric might not look that bad, but then you take it off and realize how disgusting it was. Hallelujah for reupholstering.
![]()
Step 3. Paint the Chair Frame (Optional)
With fabric removed, time to paint. I wanted a super shiny finish to complement our red super shiny coffee table. I opted for spray paint because of the nooks and crannies on these chairs, but I still haven’t quite nailed my spray painting routine. Specifically, I have no idea where people spray paint without spray painting everything within 12 square feet. I didn’t bother taping off the foam as you can see…. fabric was going over it and saved me the hassle… I probably should have though as spray paint can corrode some foam. Oh, Lesson 3: red spray paint makes a mess of things. Apologies… no pictures of this stage; I was hoping to keep all of this on the DL so Mark wouldn’t laugh at me for being such a DIY disaster. But here’s a glimpse of the color:
![]()
Step 4. Trace and Cut Out the New Fabric
I let the chairs sit for a good 48 hours before moving on to upholstering (and to rest my now red and aching fingers after the whole nailhead/ staple removal process). The upholstering was actually the easiest part of this whole project. Using the old nasty fabric as a template, I traced each piece onto my new fabric leaving plenty of extra room for stapling.
![]()
I made sure to focus on where the template was laid out on the fabric so the pattern wasn’t misaligned and crooked on the chairs.
![]()
Step 5. Staple the seat fabric
Check out this tutorial for another explanation of the process in case I miss any steps. I started with the seat, being careful to center the chevrons. I put in a few staples on the back, then moved around, pulled the fabric straight and taught and and stapled the front down. Then I filled in around the edges making sure chevrons were straight and fabric was tight. I used the same process for the arms. (My foam was in good shape so I didn’t have to replace it; if it had needed replacing, I would have used the old foam as my guide and cut new foam for the seat and arms.)
![]()
![]()
Step 5. Assemble and Upholster the Chair Back
The back. Oh, the back threw me, but by the second chair I’d figured it out. The chairs I bought had tufting (the little buttons). I wanted something cleaner so was getting rid of the tufting. When I took it apart, there was a layer of fabric and batting on the backside, and a layer of cardboard (to hold the concave shape), foam and fabric on the front. I replaced the batting and the foam. First I stapled the fabric for the back.
![]()
![]()
![]()
Then, I layered the batting, cardboard, foam and fabric and stapled all of these on top. Kind of like a fabric sandwich with batting, cardboard and foam in the middle. I found that a few staples on the top and then a few on the bottom held all the layers in place so I could go around pulling it all tight and stapling the edges.
![]()
![]()
Step 6. Upholster the arm cushions
Lay a small piece of fabric over the arm cushions, making sure the pattern is aligned, and staple along the edge being careful the staple line is in the groove around the cushion.
![]()
Step 7. Trim excess Fabric
Phew. This was my first glimpse of what these chairs would look like, and I’m digging them. (Let’s be honest, you could stick a chevron fabric on a toilet bowl and I might put it in my living room.) I trimmed the fabric edges as close to the staple line as I could and set up the sewing machine for the double welt cord.
![]()
Step 8. Make the double welt cord to conceal the staples
I was hoping to find ready made double welt cord and use a double welt sewing machine foot, but alas… Jo Ann fabrics didn’t have the cord and the sewing machine foot needed to be ordered. So thanks to Kate over at Centsational Girl, I converted my single cord to double cord. My seams are still a little shaky and it’s not as neat and tidy as a professional, but it does the trick of covering all those unsightly staples and frayed fabric.
![]()
With my hot glue gun, I wound the cord around the chair to cover all the staples. I screwed up on the first chair by not winding it around the arms of the chair… you’d never notice, but it’s much cleaner to wrap the whole length of the seat since it leaves only the one point where you’ve cut the cord.
![]()
![]()
Last lesson learned: this wasn’t as easy or quick as I was expecting, but… it wasn’t hard either. And I’m thrilled with the results. Sure, there are always little parts of these projects that I wish I’d done differently or want to go back and change, but I probably won’t. And no one will notice the frayed cord under the right arm or the sliver of fabric you can see behind the welt on the back.
![]()
![]()
![]()
Cost of these chairs retail= $340 each on average.
Cost of getting them professionally reupholstered= $250 each
Cost for these= Maybe $150 all in. For both.
I love what these do for the living room space and after a dinner party we hosted this weekend, it was great to have the extra seating just from a functional point of view. And… Eleanor now has more seating for her stuffed animals and dolls, so there’s that! Here’s another before/ after to save you the scrolling!
![]()
Materials for Reupholstering Chairs
(Affiliate links included for your convenience.)
- Fabric similar to this
- Staples, staples and more staples. I used both 1/4″ and 3/8″.
- Staple gun. (Update… I’ve since purchased this pneumatic stapler so it requires a compressor but it’s changed my upholstery life… SO much easier!!)
- flat head screw driver/ needle nose pliers for staple and nail removal (Update: I prefer this tool specifically for staple removing.)
- hot glue gun
- double welt cord or gimp to cover staples
- spray paint


your living room is looking VERY grown up! congrats, I’m impressed with your self taught competence and enthusiasm. xoxo
Only grown up for pictures… normally it’s littered with the hoard.
The chairs look fantastic in your living room! I love the red paint colour and the material you chose. The chairs seem to pull everything in your living room together. Great job! Thanks for sharing this.
Thanks, Pat! I love them too!
Hi Charlotte! Stopped over from YHL. This is probably going to sound super crazy but I also live in Connecticut (Stratford) and I was totally loving some chairs identical to yours in price and look listed on Craigslist in Stamford just a week or so ago. Could they be the same ones and can you really get projects done that fast!?!?! Hahaha
P.S. I love what you did with them!
That’s hilarious!!! Yes, those are the ones. The other two were un sellable in my opinion but I guess she managed it! I bought mine a few weeks ago but they didn’t take that long… Just fussy work! Thanks for taking a look!
love the chairs, makes me anxious to start my rehab chair project(s)…also love your wall color–is it heart of palm by SW?…that is my bedroom wall color…i also envy your rug…beautiful makeover…also love the two matching green/white armchairs!!!
Go for it! Once you start ripping apart, it’s hard not to finish! The wall is Benjamin Moore Folk Art. It’s the boldest color we’ve ever used, but I think it’s working in this room… there are so many large windows, that there’s actually not that much wall exposed. The rug is a hand me down from my parents! I love it too.. not quite the same blue as the chairs, but close enough! The armchairs were an estate sale find reupholstered with some DEEP discount fabric I found… Upholstery costs a fortune, but I think it was worth it for these! Thanks for stopping by!
Wow! I just love those chairs! How beautiful and fun your place looks!
Thanks, Jen!
Thanks Charlotte… This was quite an inspiration! Your room looks soooo awesome.. Like straight out of HGTV magazine! 🙂 can you plz guide me as to where I can find upholstery fabrics..? I need to redo my dining room chairs.. If the fabrics are discounted, the better!
Thanks! I have a place nearby me in CT but I also have luck online at fabric.com and others. Google discount fabric.
Wow, those fun chairs look amazing! Great job!
I must ask, where did you find that hilarious “Now Freak Out and Panic” green pillow? I’d love to have one of my own.
Thanks, Robert! I found that pillow at Homegoods a while ago… Check etsy… I’ve seen lots.
I have reupholstered three sofas and a wing back and overstuffed chair… I upholstered the chairs on two different occasions. My husband and I took an upholstery class from a community class and it was great. The teacher did upholstering for a living and so we learned many tricks at the get go. Short story long, I have never done a framed chair. Your chairs look exactly like one of the framed chairs I have that needs a recover. This chair will be my trial for three other framed chairs. I might leave the finish on the one frame that is like yours “shabby chic”. In thanks for your wonderful tutorial, if you go one line and type in upholstery tools, there is a special hand tool ranging from $4-$13 specifically made for removing staples. It was the greatest thing since sliced bread, because there are about a bazillion staples to remove in a sofa. Thanks again. I am so excited to do this.
I’ve been looking around for an upholstery class like that! Sounds SO great!!!!!! These chairs weren’t that hard… although piping is still my nemesis. More specifically, the bias strips out of which to make the piping. I love the idea of leaving the finish ‘shabby chic’! I actually just redid my chairs and will be posting about them soonish once I finish dolling up the rest of the room. Good luck with your chairs!!
I used a hot glue gun to attach the piping. And yes… I have miles of it in my future. I just need to suck it up. The chair I need to tackle next will require lots o’ fabric. I love the remnant places too!
Thank you so muchfor your post. Simple Answers to my questions. It was so hard to find here on pinterest.